Remember when we used to work on school projects and needed a presentation? It was such a hassle for everyone to collaborate on a single project. We had to email the presentation around, and if there was an issue, we’d resend it. Then, everyone had to delete the old version and download the new one. It was tough to see what changes someone made. In fact, someone had to keep a separate list just to track the changes and the presentation.
However, today it’s a different story. If I had the ability to go back in time, I would definitely have used GIT.
What is GIT
Git is an open source tool which is used mostly by software developers to track the changes and help in easy collaboration between multiple people across entire projects.
GIT is a Version Control System (VCS). Before we understand what a Version Control System is, first we need to understand what versions are.
Whenever you work on a project, you don’t create it in one shot. You improve it step by step:
- first draft
- small improvement
- new feature
- bug fix
Each meaningful state of the project is a version. In Git, a version is not just “the next file” or “an updated copy”. A version in Git is a snapshot of the entire project at a specific moment in time.
Hence, a version control system is a software that records these snapshots, keep them organised and allow us to move between them easily. Git is one of the widely used version control system.
Why GIT is used?
Git is primarily used for multiple reasons such as:
- Keeping Track of the changes: As the project grows bigger, manually tracking changes become impossible. However, Git automatically take cares of this problem by keeping a history of every single change done to the project, author who did the changes and when the changes were done.
- Easy Collaboration with others: Git allows multiple people to work on the same project without constantly sending files back and forth.Platforms like GitHub act as a shared place where people can synchronize their work, review changes, and collaborate efficiently.
- Allow to work on multiple features at once: Git allows multiple people to work on separate features using the branches and then later merge those features into the main codebase, hence boosting efficiency and development speeds.
Common Terminologies
- Working Directory: This is the current folder where your codebase is located. It includes all the files and folders you see and work on. It contains all the files tracked, modified, untracked, and ignored by Git.
- Local Repository: This is the hidden
.gitfolder that contains a snapshot of your entire project. - Staging Area: This is where changes made to files in the working directory are stored before saving a snapshot of these changes in the local repository.
- Remote Repository: A Git repository stored on a remote server or cloud platform like GitHub is called a Remote Repository.
- Commit: A commit is when you create a new snapshot of changes from the working directory to the local repository through the staging area.
- Push: The process of moving changes from the local repository to the remote repository is called pushing.
- Fetch: The process of checking for any new changes from the remote repository is called fetching.
- Pull: The process of bringing new changes from the remote repository into the local repository and the current working directory is called pulling.
- Untracked Files: These are the files in the working directory that are not being tracked for changes by Git. In VSCode, they are usually marked with a “U” symbol.
- Modified Files: These are the files in the working directory that are being tracked and have been modified. They are usually marked with an “M” symbol in VSCode.
- Added Files: These are files in the working directory that were initially untracked by Git and have been added to the staging area but haven’t been committed yet. In VSCode, they are usually marked with an “A” symbol.
- Deleted Files: These are files in the working directory that are tracked by Git and have been deleted from the working directory. They are usually marked with a “D” symbol in VSCode.
- Branch: A branch allows you to create a separate line of development, enabling you to work on features or fixes without affecting the main codebase.
- HEAD: This is a pointer that shows the current branch or commit you are working on in your repository.
GIT Basics: How GIT Works
To understand, how Git works, here’s a diagram from the official GIT website.
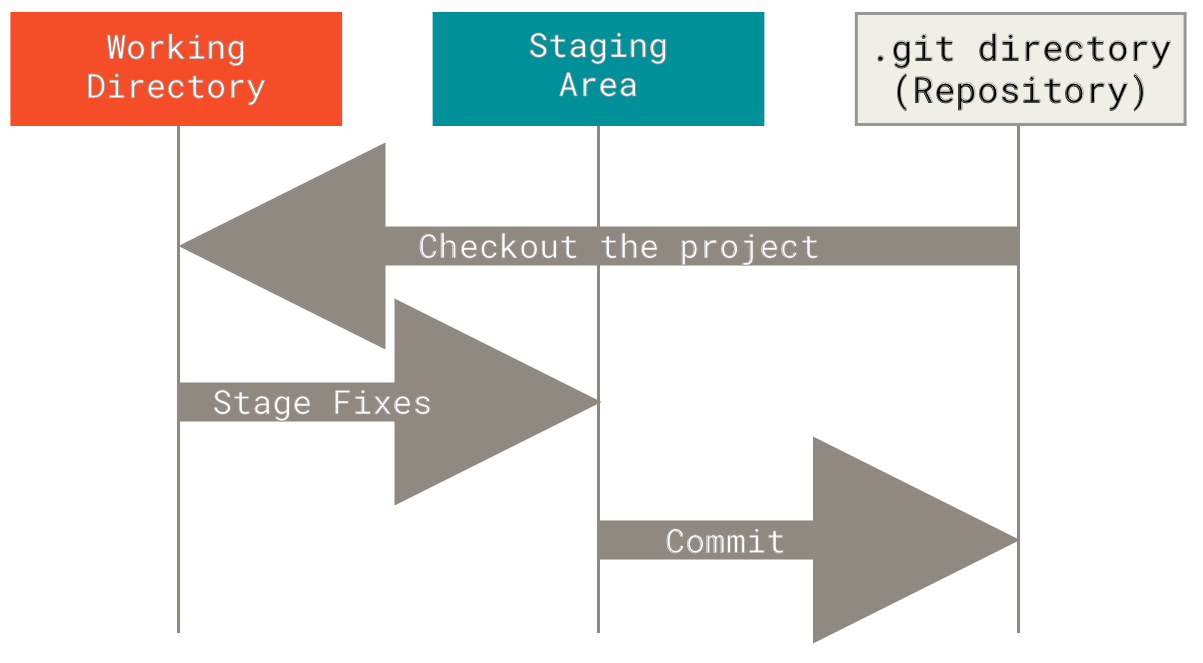
- Initially, you have a blogs/project folder or the working directory where no files are being tracked by the GIT.
- When we run a command
git init, it initialize an empty git repository and a new hidden.gitfolder is created in the same directory. - Currently most of the files are still untracked. So, we need to tell the git to start tracking the files and we use
git add .command. Once we run this command, then all the files are sent to the Staging Area and the files are now being tracked by the GIT. - Once we are satisfied with all the changes, we run the command
git commit -m “some message“and all the changes from the staging area is sent to the local repository, hence creating a snapshot of the entire project. - Now at this point, our entire project is being tracked by the GIT.
- If we make a change in our working directory at this point, either by modifying some file or adding a new file, GIT will immediately notice the files are modified.
- So, we need to again use
git add .command and send the modified files to the staging area and commit them again to save a new snapshot of these changes. - By running the command
git log, we can see entire history of the commits which includes the hash, author and the commit message.
Common GIT Commands
- git init: This command creates an new local repository in your current working directory. In other words, this will convert your normal project folder into a git repository.
- git add: This command allows git to understand which files to track and add them into the staging area. We can add single file like
git add hello.txtor all the files using dot symbol likegit add . - git commit: This command sends the changes from the staging area into the local repository. It also includes a message flag with it like
git commit -m “initial commit“. - git log: This command shows the entire history of the commits done inside a GIT repository. These logs contain the hash, author, date/time and commit message. There’s also another version of this command that prints shorter logs with
—onelineflag. Command becomesgit log —oneline. - git diff: This command shows the changes between the commits. we can use it like
git diff <hash_1> <hash_2>or we can see changes in staging area likegit diff —staged. - git branch: This command will show all the branches that exists in the current repository. The branch that shows with aestricks (*) like
main*is the currently active branch. - git pull: This command fetches the latest changes from the remote repository and merges them into the current branch.
- git push: This command sends your local commits to the remote repository.
Conclusion
GIT is a powerful tool that allows for tracking changes and collaboration with other team members in a much easier way and it’s not even difficult to learn. With only these commands shown in the above section we can achieve 95% of the work in the GIT.