
React Native is one of the most popular frameworks for building cross-platform mobile applications. Unlike some frameworks, React Native does not include a built-in navigation or routing solution in its core.
Developers typically rely on third-party libraries to handle screen navigation, with React Navigation being the most widely used and feature-rich option.
For projects using Expo, Expo Router provides a file-based routing system that offers a more intuitive developer experience. Although Expo Router was originally built on top of React Navigation, it became independent of React Navigation as a runtime dependency starting with Expo SDK 56.
Without further delay, let’s dive into our first topic.
What is React Navigation?
React Navigation is a navigation library that allows users to navigate between different screens in React Native and React Native Web applications.
It provides routing logic, deep linking support, and a collection of common navigation UI components, making it easier to build intuitive navigation experiences.
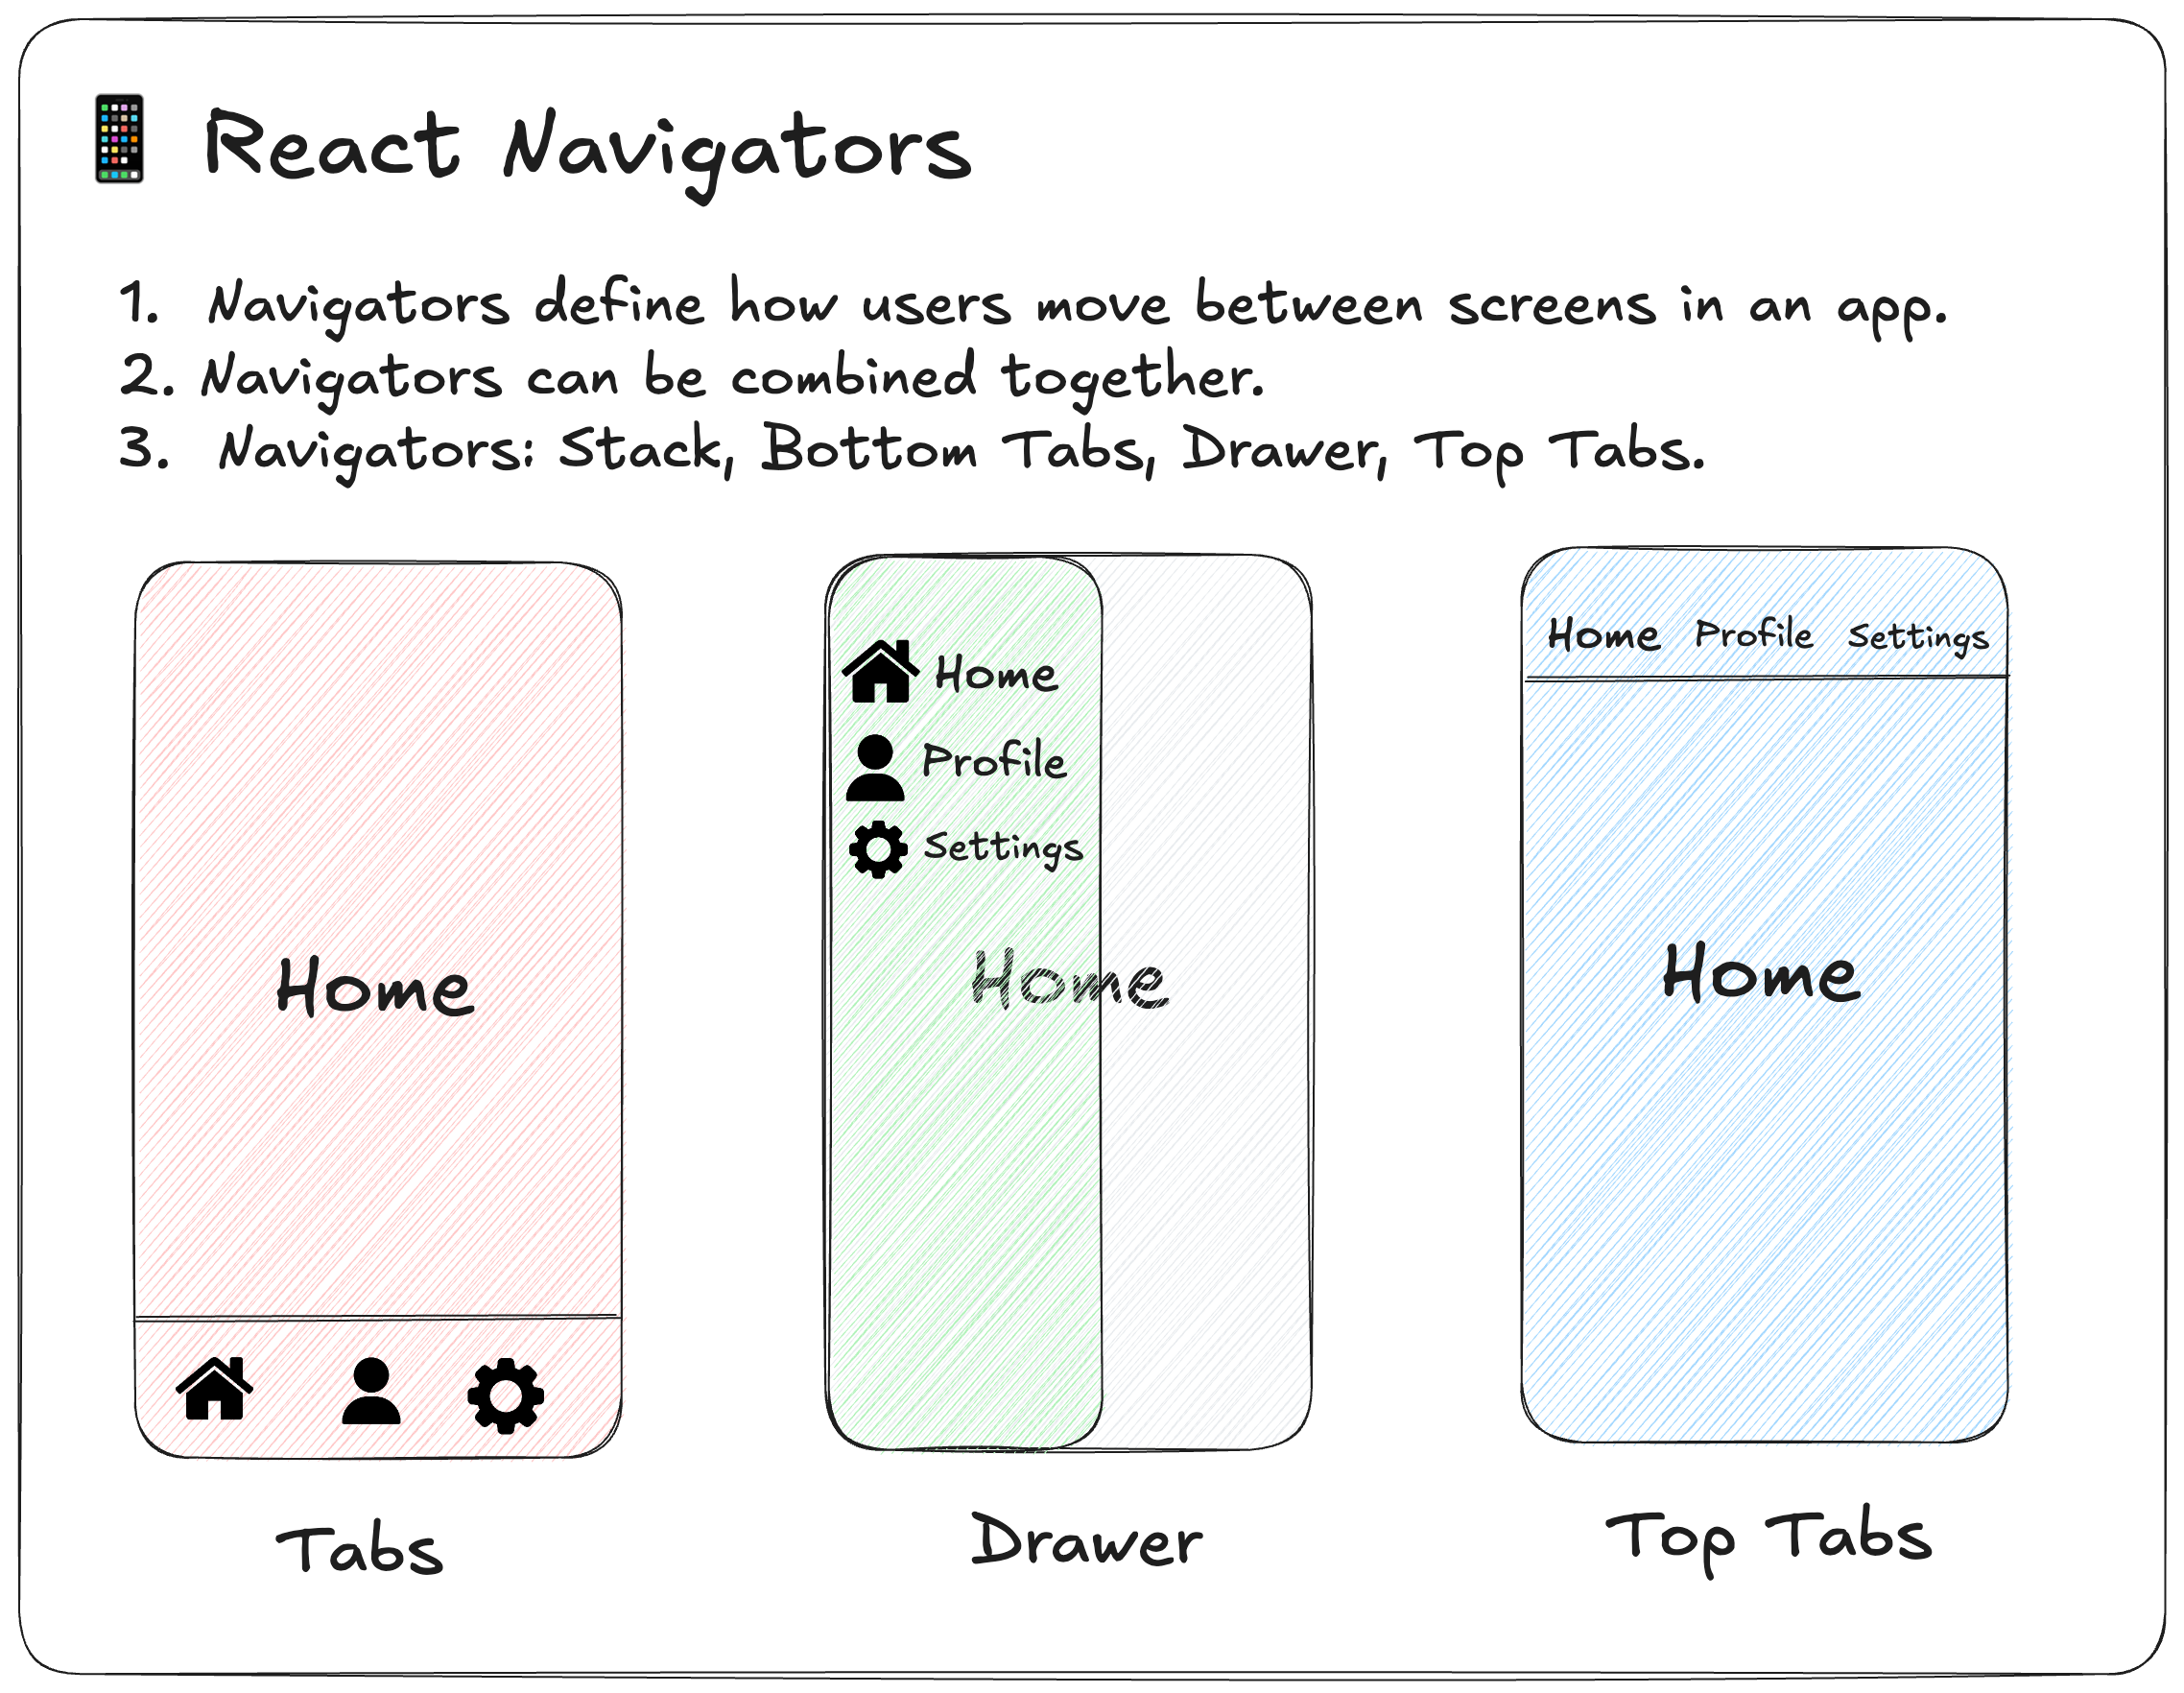
At the core of React Navigation are navigators, which determine how users move between screens.
What are Navigators?
A navigator is responsible for determining which screen is currently displayed, how users move forward to new screens or back to previous ones, and how navigation headers behave throughout the application.
React Navigation provides several types of navigators, including:
- Stack Navigator
- Native Stack Navigator
- Bottom Tab Navigator
- Drawer Navigator
- Material Top Tab Navigator
Stack Navigator
A Stack Navigator organizes screens in a stack, where each newly opened screen is placed on top of the previous one.
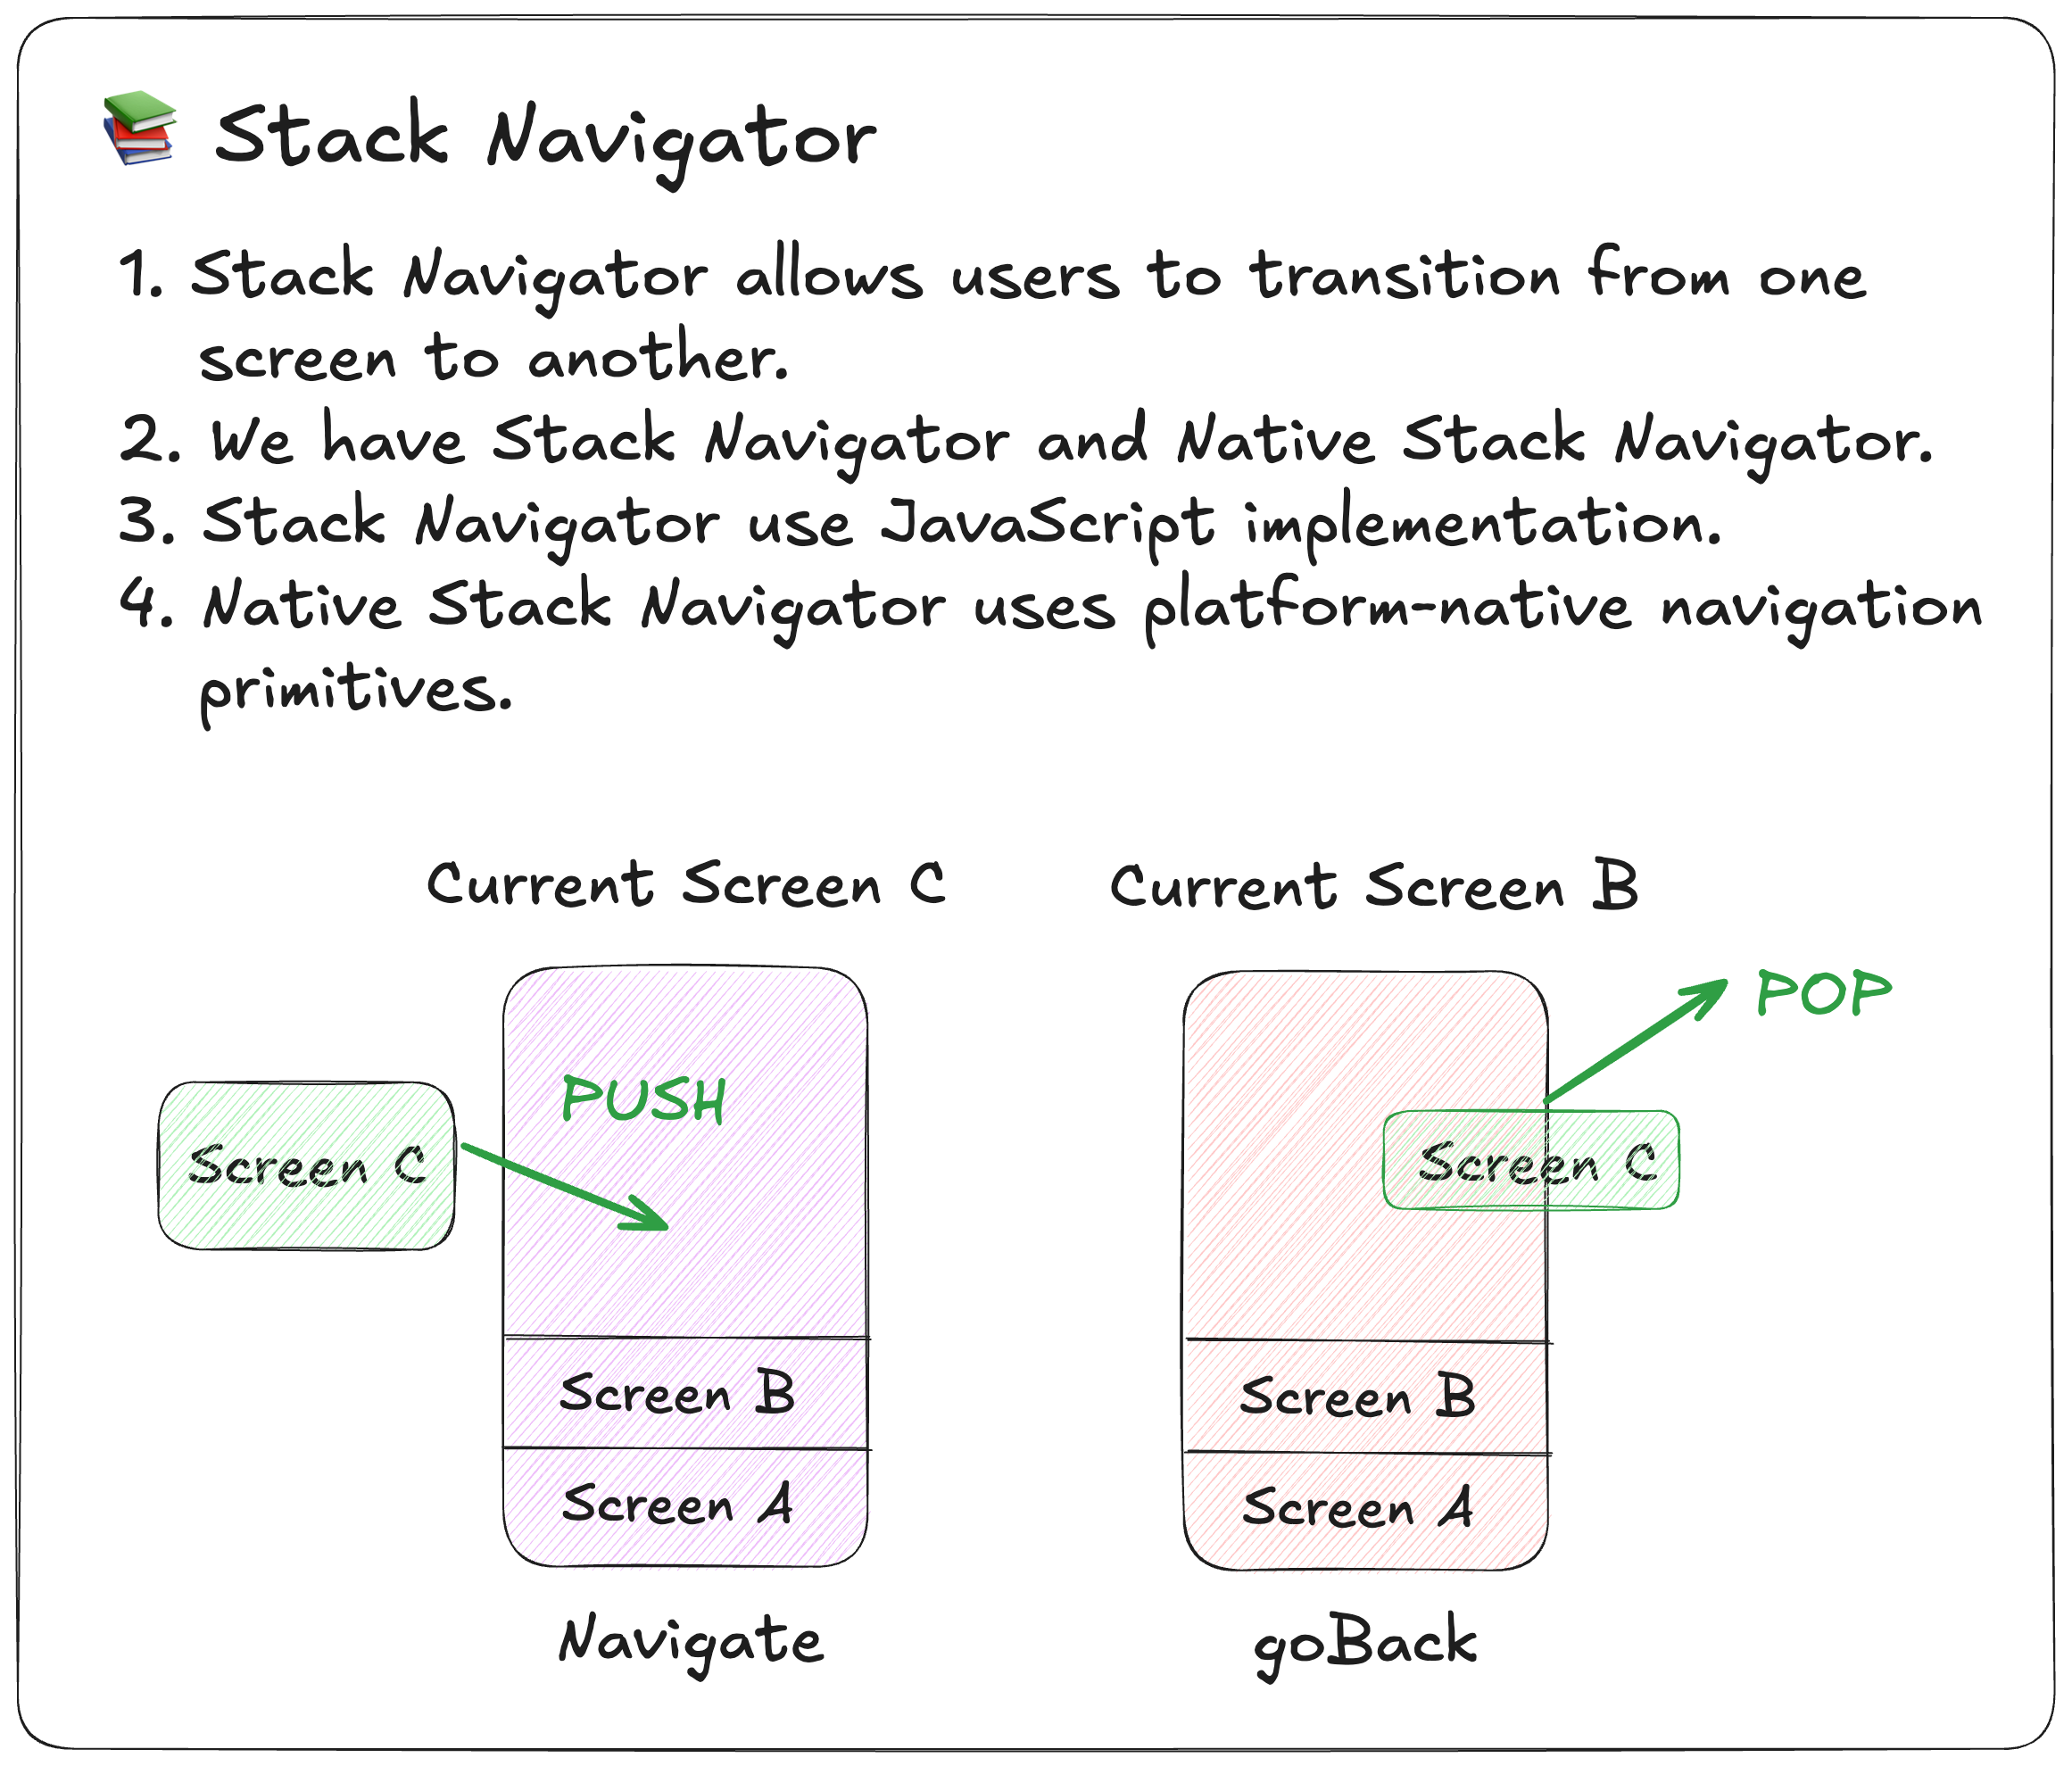
Internally, it maintains a stack of screens. Whenever a user navigates to a new screen, that screen is pushed onto the top of the stack. When the user navigates back, the current screen is popped from the stack, revealing the previous screen.
Stack Navigator also provides smooth transition animations, such as slide and fade effects, when moving between screens. Since it only controls navigation behavior, it does not display any persistent navigation UI on the screen.
Stack vs Native Stack
Stack Navigator is implemented in JavaScript and provides highly customizable transitions.
Native Stack uses the native navigation primitives provided by iOS and Android, resulting in better performance and platform-consistent animations.
Tab Navigator
A Bottom Tab Navigator displays a navigation bar at the bottom of the screen. Each tab typically consists of an icon and a label representing a major section of the application.
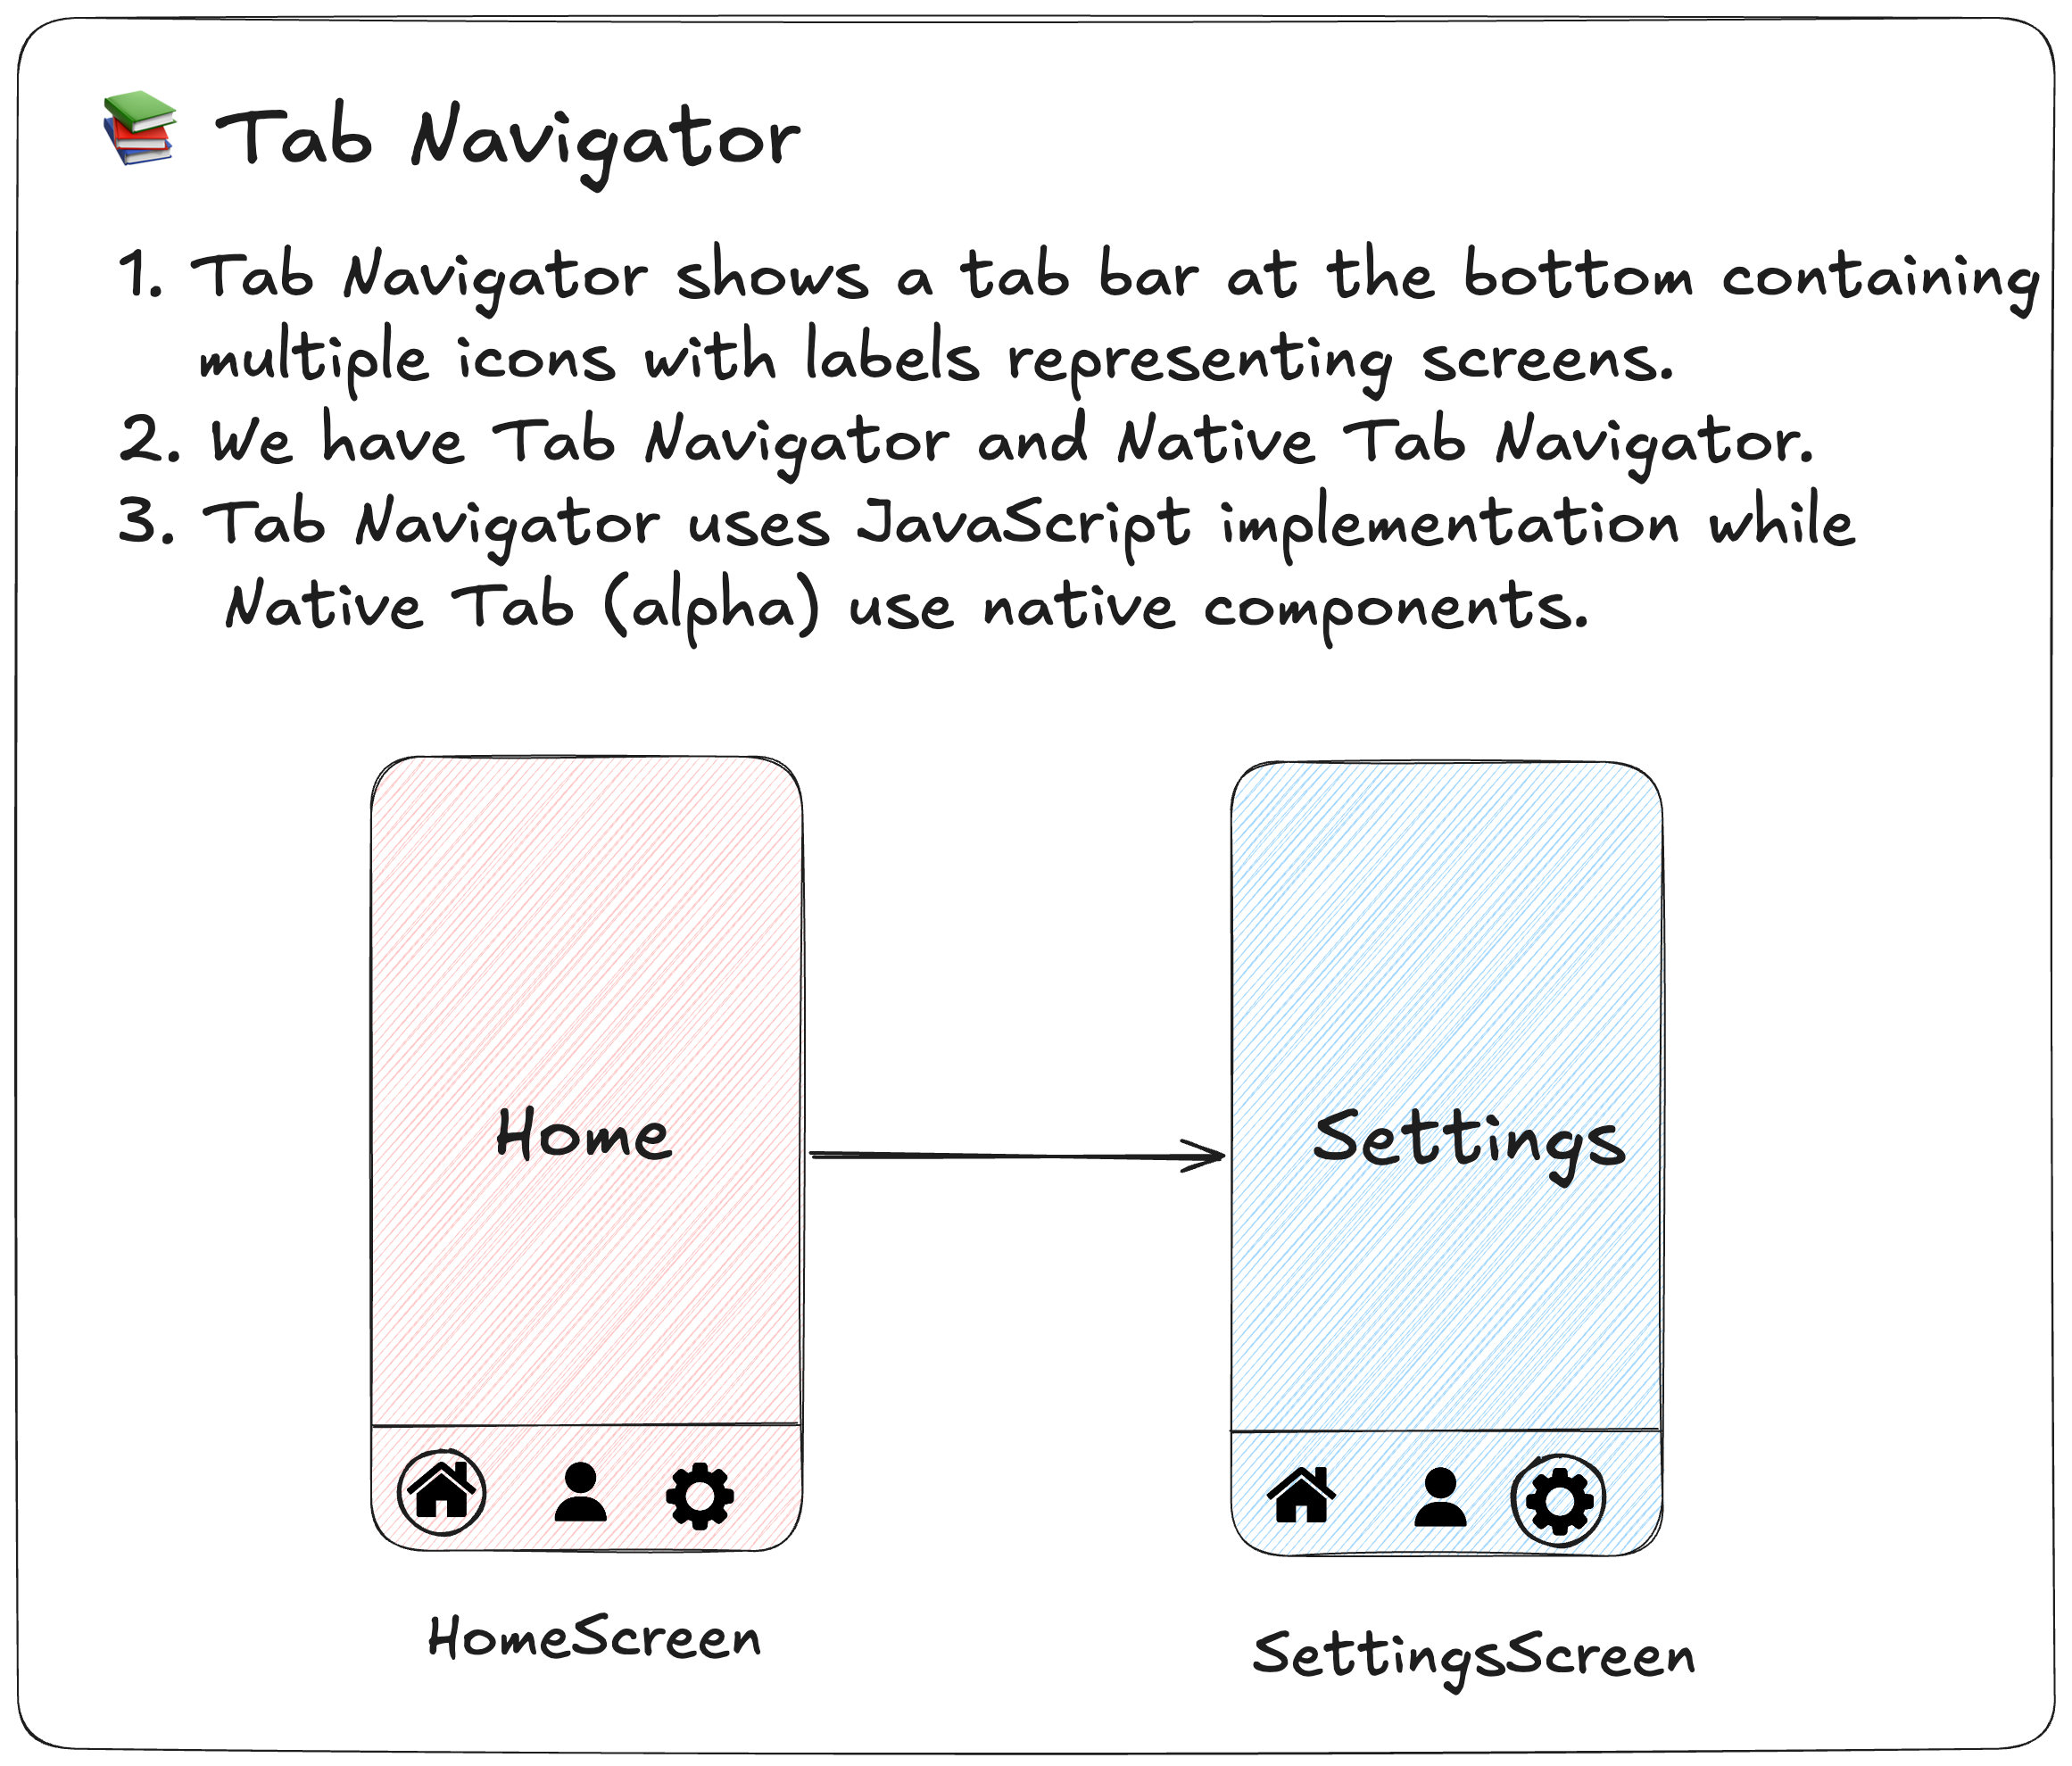
When a user taps a tab, the corresponding screen is displayed immediately.
The bottom tab bar remains visible while navigating between its tabs and can be customized to match the application’s design. React Navigation’s Bottom Tab Navigator is implemented entirely in JavaScript.
React Navigation also offers a Native Bottom Tabs Navigator, which uses platform-native tab components for improved performance and a more native look and feel. At the time of writing, it is still in alpha.
Drawer Navigator
A Drawer Navigator provides a side navigation drawer that is usually hidden off-screen. It can be opened either by tapping the hamburger menu in the header or by swiping from the edge of the screen.
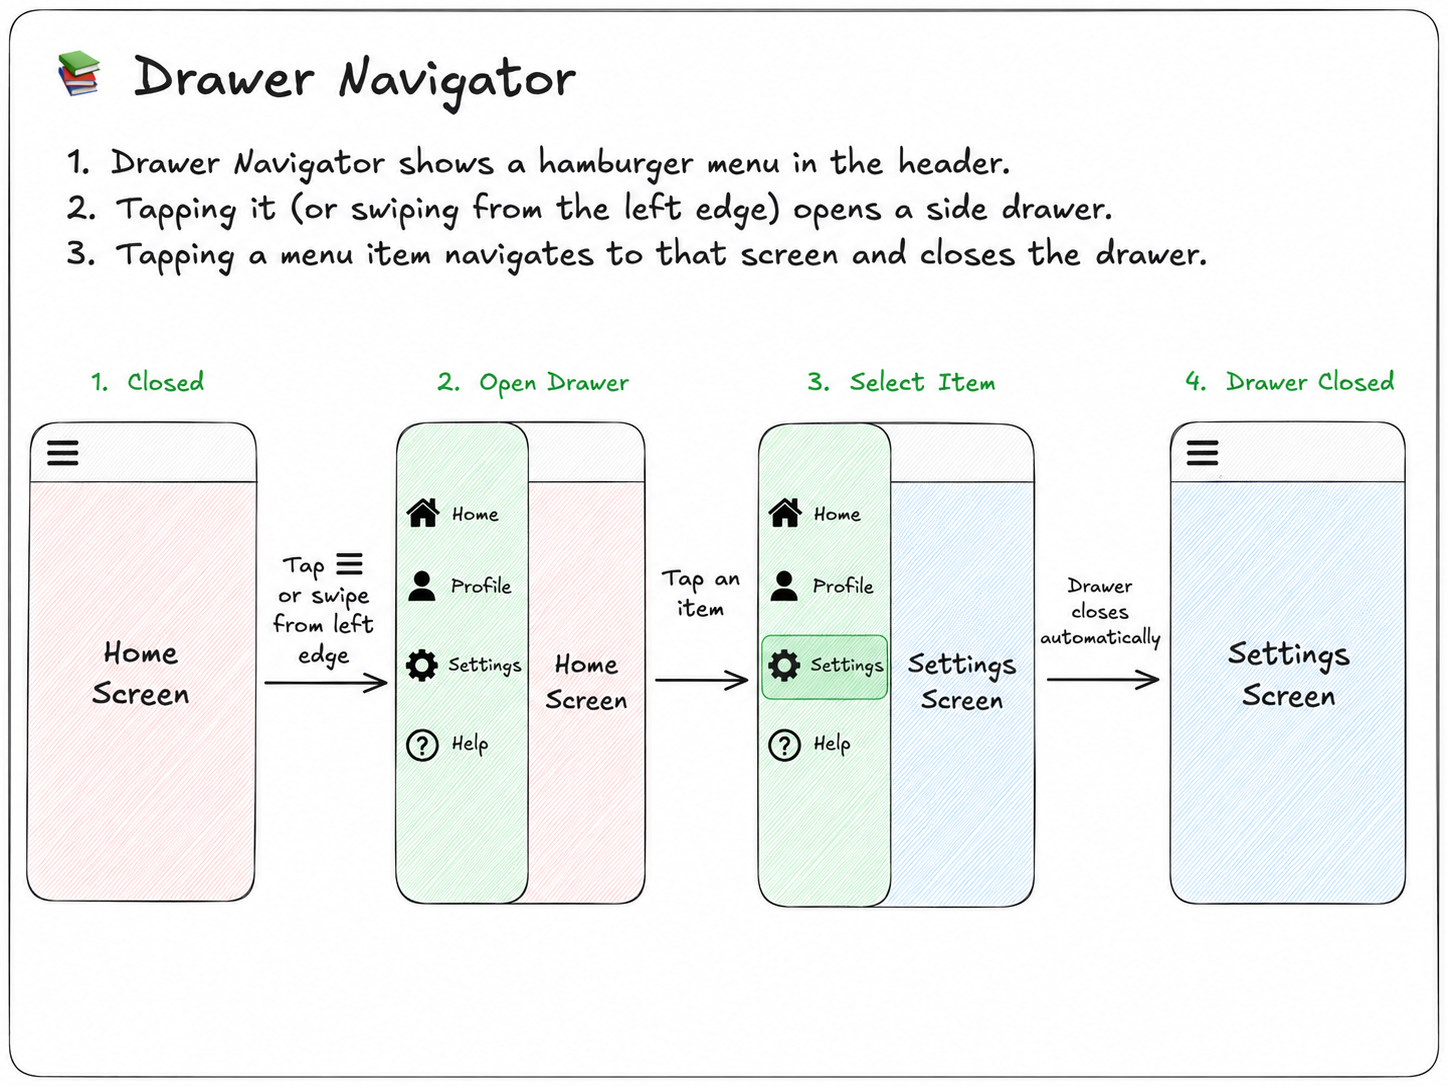
The drawer displays a list of available screens. Selecting one of the items navigates to the corresponding screen and automatically closes the drawer.
Drawer navigation is commonly used in applications with many top-level screens that cannot be conveniently displayed using a bottom tab bar.
Material Top Tab Navigator
A Material Top Tab Navigator displays a tab bar at the top of the screen. Each tab usually contains a label, an icon, or both, representing different screens in the application. When a user taps on a tab or swipes horizontally, they are navigated to the corresponding screen.
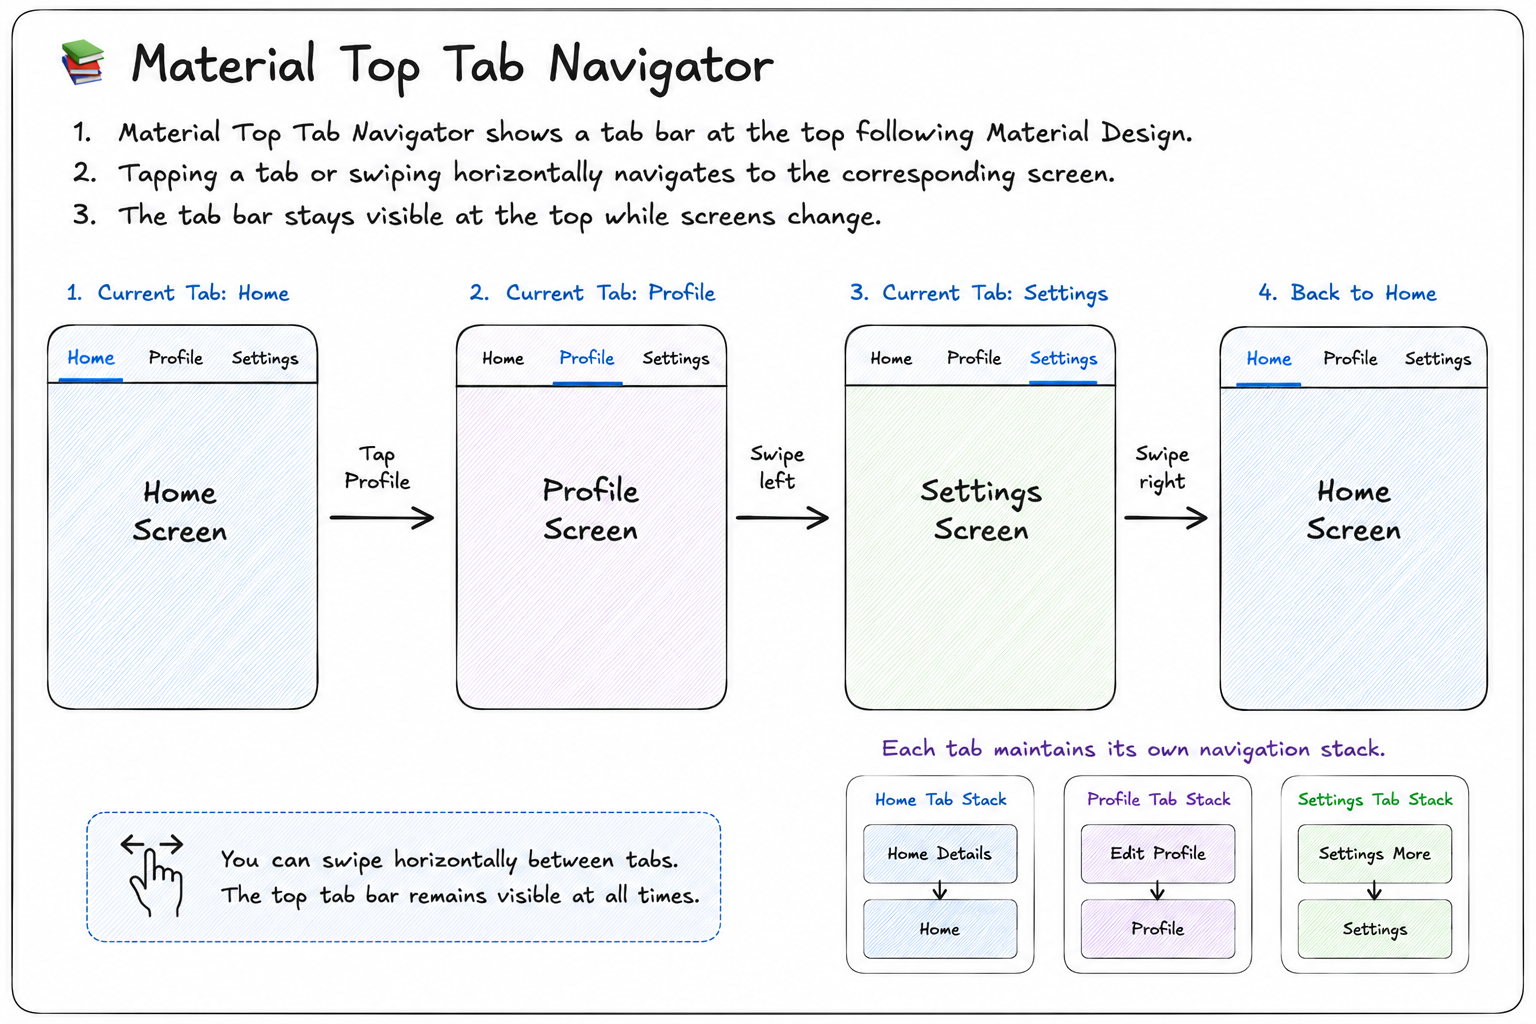
The tab bar remains visible at the top of the screen while navigating between tabs. It follows Google’s Material Design guidelines and supports swipe gestures, animated transitions, and scrollable tabs when there are many screens.
For the sake of simplicity, we will proceed with the Stack Navigator setup to understand the installation of React Navigation library in React Native CLI app.
Installation
To begin the installation, first we need to create a bare react native app or an expo app with blank template.
bunx @react-native-community/cli@latest init AwesomeProjectFor expo apps, you can use this command to have a blank template.
bun create expo --template blank-typescript@sdk-57Now, let’s begin with installing the dependencies for the React Navigation.
bun add @react-navigation/native

// For Expo
bunx expo install react-native-screens react-native-safe-area-context

// For CLI
bun add react-native-screens react-native-safe-area-context
bunx pod-install ios // if on macos and developing for iOS
For CLI, we need to perform some additional configurations. We need to modify the MainActivity.kt file in the android folder to configure react-native-screens.
Navigate to android/app/src/main/java/<package_name>/ and edit the MainActivity.kt file and add following code:
import android.os.Bundle
import com.swmansion.rnscreens.fragment.restoration.RNScreensFragmentFactory

// Rest of the code

class MainActivity: ReactActivity() {
  // Rest of the code
  override fun onCreate(savedInstanceState: Bundle?) {
    supportFragmentManager.fragmentFactory = RNScreensFragmentFactory()
    super.onCreate(savedInstanceState)
  }
  // Rest of the code
}
We need to perform this modification because React Navigation depends on react-native-screens and this configuration will allow proper fragment restoration on android after the process recreation.
React Navigation installation has been successful on your react native project. Now it’s time to add and configure a navigator in our code.
Configuring the Navigators
React Navigation provides two ways to configure navigators such as stack, tab, drawer navigators:
- Static Configuration
- Dynamic Configuration
Both of these configurations achieve the same goal of defining the screens in your application, but they differ in how the navigation tree is defined.
Static Configuration
Static configuration defines the navigation structure as a static object. Since the navigation tree which includes available screens, header configurations etc are known ahead of time, the React Navigation can apply various optimizations and provide improved TypeScript type inference.
import { createNativeStackNavigator } from "@react-navigation/native-stack";
import Home from "../../screens/Home";
import About from "../../screens/About";
import Profile from "../../screens/Profile";
import { createStaticNavigation } from "@react-navigation/native";

const MyStack = createNativeStackNavigator({
    screens: {
        home: Home,
        about: About,
        profile: Profile
    },
    initialRouteName: "home",
    screenOptions: { headerShown: false }
})

const Stack = createStaticNavigation(MyStack)

export default function StaticStackNavigator() {
    return <Stack />
}
In the above code example, we can see that we use createNativeStackNavigator to define the screens, initialRouteName and screenOptions. We then use createStaticNavigation and return the created Stack. This can be used in parent app component in the application.
function App() {
  const isDarkMode = useColorScheme() === 'dark';

  return (
    <>
      <StatusBar barStyle={isDarkMode ? 'light-content' : 'dark-content'} />
      <StaticStackNavigator />
    </>
  );
}

export default App;
Now the screen will default to home route and can be used to navigate to different screens like about and profile defined in the navigator.
screenOptions specifies options that apply to every screen managed by the navigator. Instead of configuring each screen individually, you can define common behavior such as header visibility, transition animations, and gesture support in one place.
Dynamic Configuration
Dynamic configuration defines the navigation tree using React components. Unlike static configuration, the navigator is created while React renders your components.
Although this approach requires slightly more boilerplate, it provides greater flexibility and allows the navigation tree to change based on runtime state.
import { createNativeStackNavigator } from "@react-navigation/native-stack"
import About from "../../screens/About"
import Home from "../../screens/Home"
import Profile from "../../screens/Profile"
import { NavigationContainer } from "@react-navigation/native"

const Stack = createNativeStackNavigator()

function MyStack() {
    return <Stack.Navigator
        screenOptions={{headerShown: false}}
        >
        <Stack.Screen name="home" component={Home} />
        <Stack.Screen name="about" component={About} />
        <Stack.Screen name="profile" component={Profile} />
    </Stack.Navigator>
}

export default function DynamicStack() {
    return <NavigationContainer>
        <MyStack />
    </NavigationContainer>
}
In the above example, we again use createNativeStackNavigator but instead of defining the configuration as a static object, we return the Stack.Navigator inside a function and define the multiple screens with Stack.Screen inside it. Then we return the same stack inside NavigationContainer.
In the static configuration API, we don’t need to use NavigationContainer because createStaticNavigation() creates a navigation component that internally wraps the navigator with a NavigationContainer.
But you might be thinking. Okay! If both achieve same result, why even call it the dynamic?
It is called dynamic because the navigation tree is created while React renders your components. This means the available screens can change based on application state, user permissions, feature flags, or any other runtime condition.
function AppNavigator() {
  const { isLoggedIn } = useAuth();

  return (
    <Stack.Navigator>
      {isLoggedIn ? (
        <>
          <Stack.Screen name="Home" component={HomeScreen} />
          <Stack.Screen name="Profile" component={ProfileScreen} />
        </>
      ) : (
        <Stack.Screen name="Login" component={LoginScreen} />
      )}
    </Stack.Navigator>
  );
}
In the above example, let’s say we have a hook useAuth() that provides a boolean value isLoggedIn to tell whether the user is authenticated or not. In the code example you can clearly see that if user is logged in, only then they can be navigated to Home or Profile screen, else they can only see the Login screen.
Navigation Methods
React Navigation provides several methods for navigating between screens and managing the navigation stack.

The following diagram summarizes the most commonly used navigation methods available in React Navigation.
React Navigation provides the useNavigation hook, which exposes the navigation methods shown in the diagram.
import { useNavigation } from '@react-navigation/native';

function GoToProfileButton() {
  const navigation = useNavigation();

  return (
    <Button title="Go Profile" onPress={() => navigation.navigate('Profile')} />
  );
}
Nested Navigators
Modern mobile applications rarely use a single navigation pattern throughout the entire app. For example, applications like Instagram display a Bottom Tab Navigator on the main screens, but when you navigate to screens such as Settings, the bottom tab bar is no longer visible.
How is this possible?
React Navigation allows you to nest navigators, where one navigator acts as the parent and another acts as its child. This enables different parts of your application to use different navigation patterns while maintaining a seamless navigation experience.
For example, a Bottom Tab Navigator can be used as the root navigator, while each tab contains its own Native Stack Navigator. When you navigate deeper within a stack, screens such as Settings can occupy the entire screen without displaying the bottom tab bar.
import { NavigationContainer } from "@react-navigation/native";
import { createBottomTabNavigator } from "@react-navigation/bottom-tabs";
import { createNativeStackNavigator } from "@react-navigation/native-stack";

import Home from "./screens/Home";
import Profile from "./screens/Profile";
import Details from "./screens/Details";
import Settings from "./screens/Settings";

const Tab = createBottomTabNavigator();
const Stack = createNativeStackNavigator();

// 1. Tab Navigator for the main app sections
function MainTabs() {
  return (
    <Tab.Navigator screenOptions={{ headerShown: false }}>
      <Tab.Screen name="Home" component={Home} />
      <Tab.Screen name="Profile" component={Profile} />
    </Tab.Navigator>
  );
}

// 2. Root Stack Navigator
export default function App() {
  return (
    <NavigationContainer>
      <Stack.Navigator>
        {/* The Tab Navigator is nested inside the Stack */}
        <Stack.Screen
          name="MainTabs"
          component={MainTabs}
          options={{ headerShown: false }}
        />
        {/* These screens sit on top of the tabs, hiding the bottom bar */}
        <Stack.Screen name="Details" component={Details} />
        <Stack.Screen name="Settings" component={Settings} />
      </Stack.Navigator>
    </NavigationContainer>
  );
}
How it works
Stack.Navigatoris now the parent (root) navigator.MainTabsis a child Bottom Tab Navigator that contains the Home and Profile screens.- When the app launches, users see the
MainTabsscreen, displaying the bottom tab bar. - When a user navigates from Home →
Settings, the Settings screen is pushed onto the rootStack.Navigator. Because it is pushed on top of the entire Tab Navigator, it covers the bottom tab bar, giving you that full-screen experience.
This creates the following navigation hierarchy:
Root Stack Navigator
├── MainTabs (Bottom Tab Navigator)
│     ├── Home
│     └── Profile
│
├── Details
└── Settings
This is one of the most common navigation patterns in React Native applications, where a Bottom Tab Navigator serves as the root navigator and each tab manages its own navigation history using a Native Stack Navigator.
Conclusion
You now know how to set up and configure React Navigation in both React Native CLI and Expo applications. From navigators and navigation methods to nested navigators, you have the foundation needed to build robust navigation flows in your apps.
Until the next article lands, why not goBack() to the previous articles and give them a read?